Friday, February 21, 2020

Unfinished Business...

Occasionally, we still see finishes of our "Language of Flowers" series (from 2017) pop-up on the web-- 
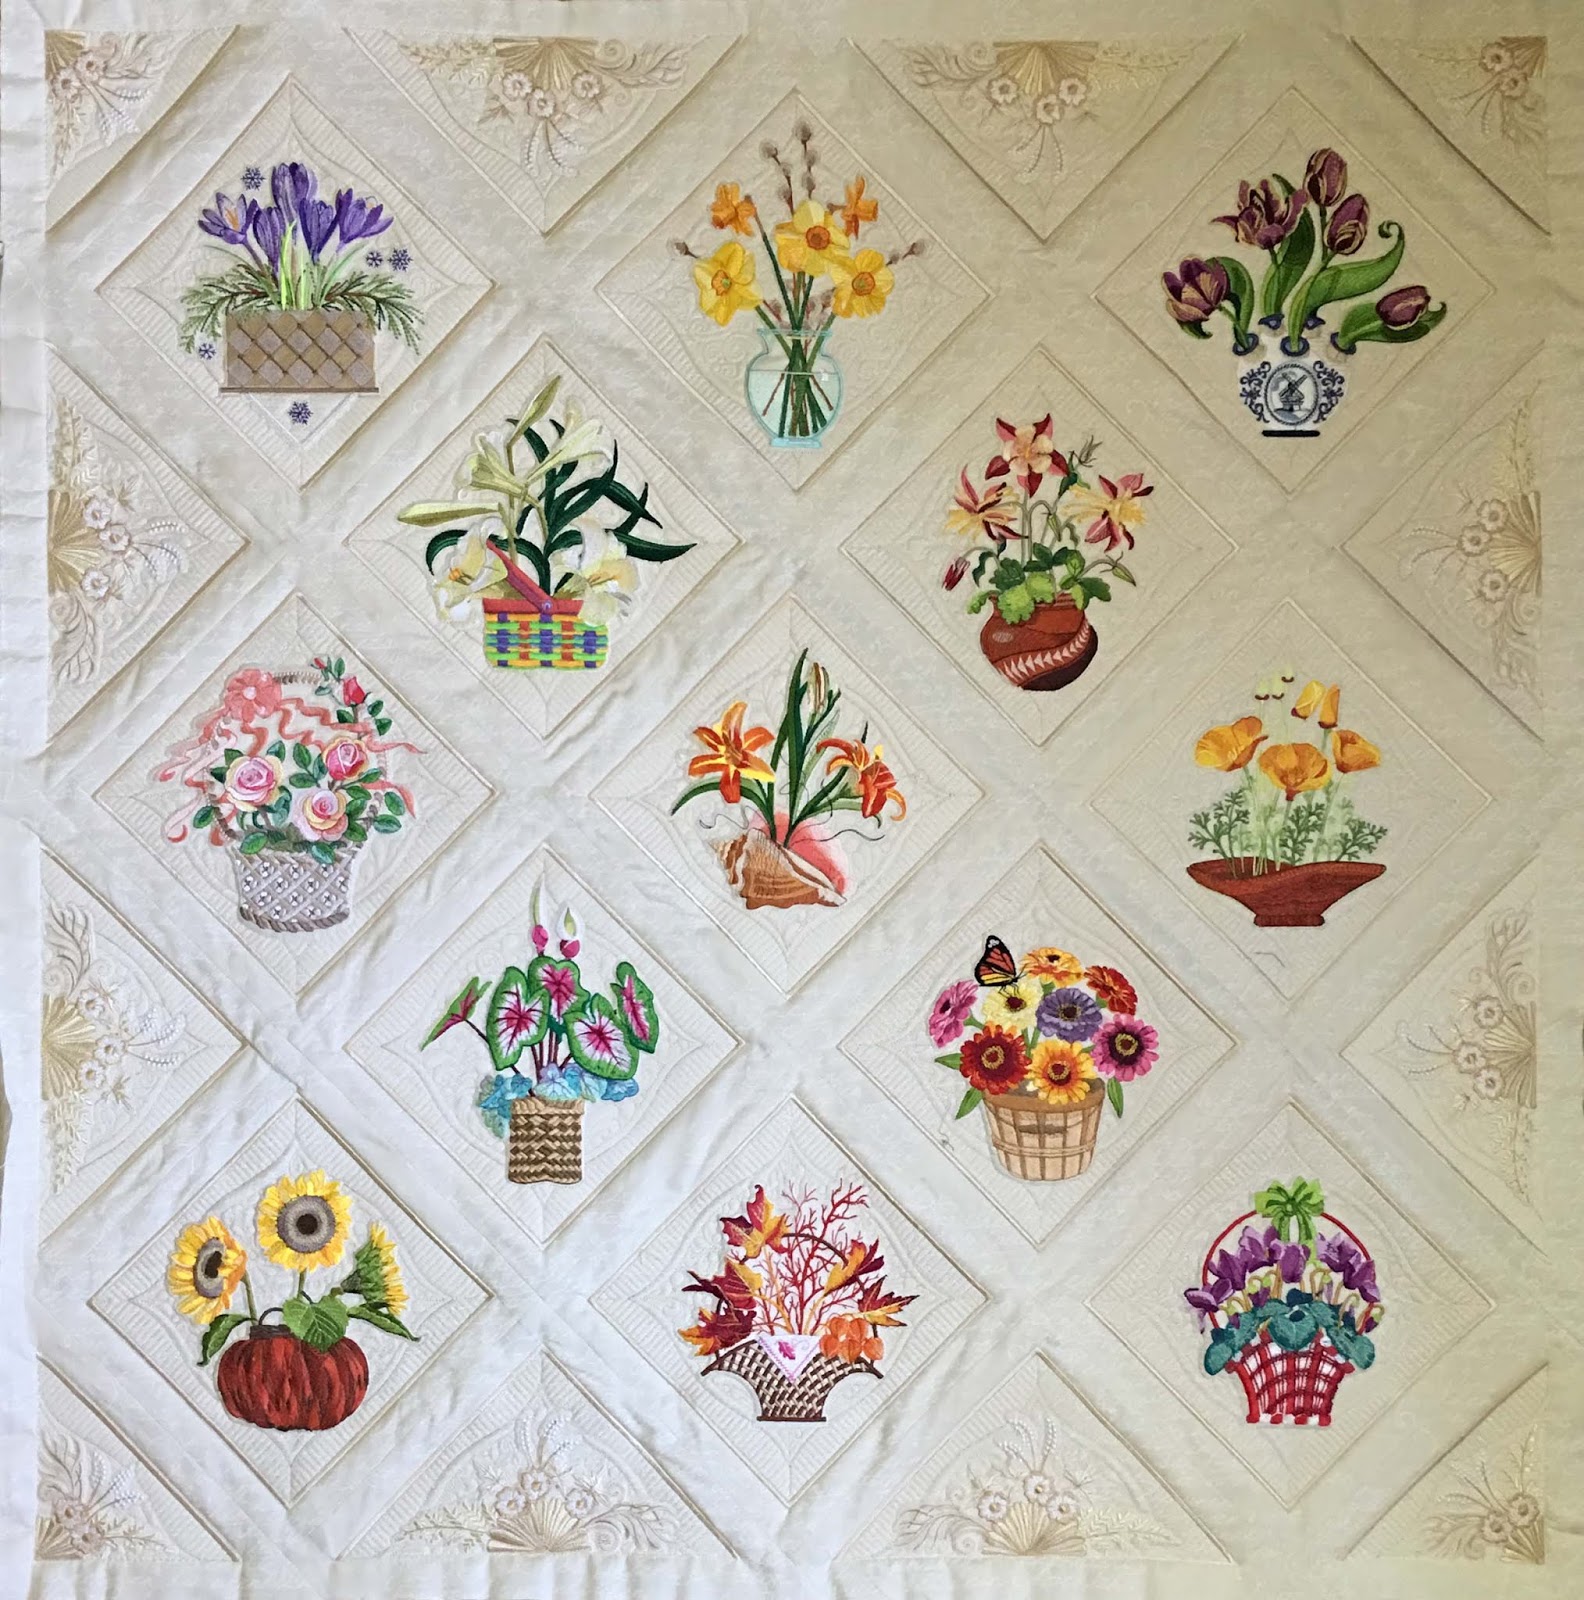
Just take a look at this eye candy from Laura G in Florida!


Laura made the all-in-the-hoop version, and her neutral background really shows off the whites in a way our white version doesn't. We LOVE the way the lilies and white roses look, don't you?

I just hate to admit that my own piece is still unfinished...
the tendency is always to keep creating new things!
 Here is "Beacoup de Bouquets" (it even has a name) from a photo dated June 2018...


and yes, it still pretty much looks like this.

Here's a personality trait that some of you will recognize--
all I had to do was bind this-- but somehow, as I always do, I kept raising the bar as I went along, wanting MORE...

Yes, some fabulous border treatment--


a lattice--


a fully machine embroidered edging treatment!


Once imagined, there is no going back to a simple binding.
Face it, the easy road is just not one I ever take. If I'm not feeling anxiety while designing, I'm not doing it right!


So here it is... on the bucket list of my life, I would sure like to finish this and not leave it as a heap of scraps for posterity.


2020 is going to be the year of "Beaucoup de Bouquets"!

To that end, I am trying to block out entire days I can spend to finish this beautiful piece...  I have broken it down into
 four easy (ha!) steps to completing it.

First up, the sashings on the main piece are saggy and all need quilting. This I actually have a start on.


Second-- we need a fabulous border embroidery.  
This is already digitized, (I've done SOMETHING over the last year and a half) but still needs testing.


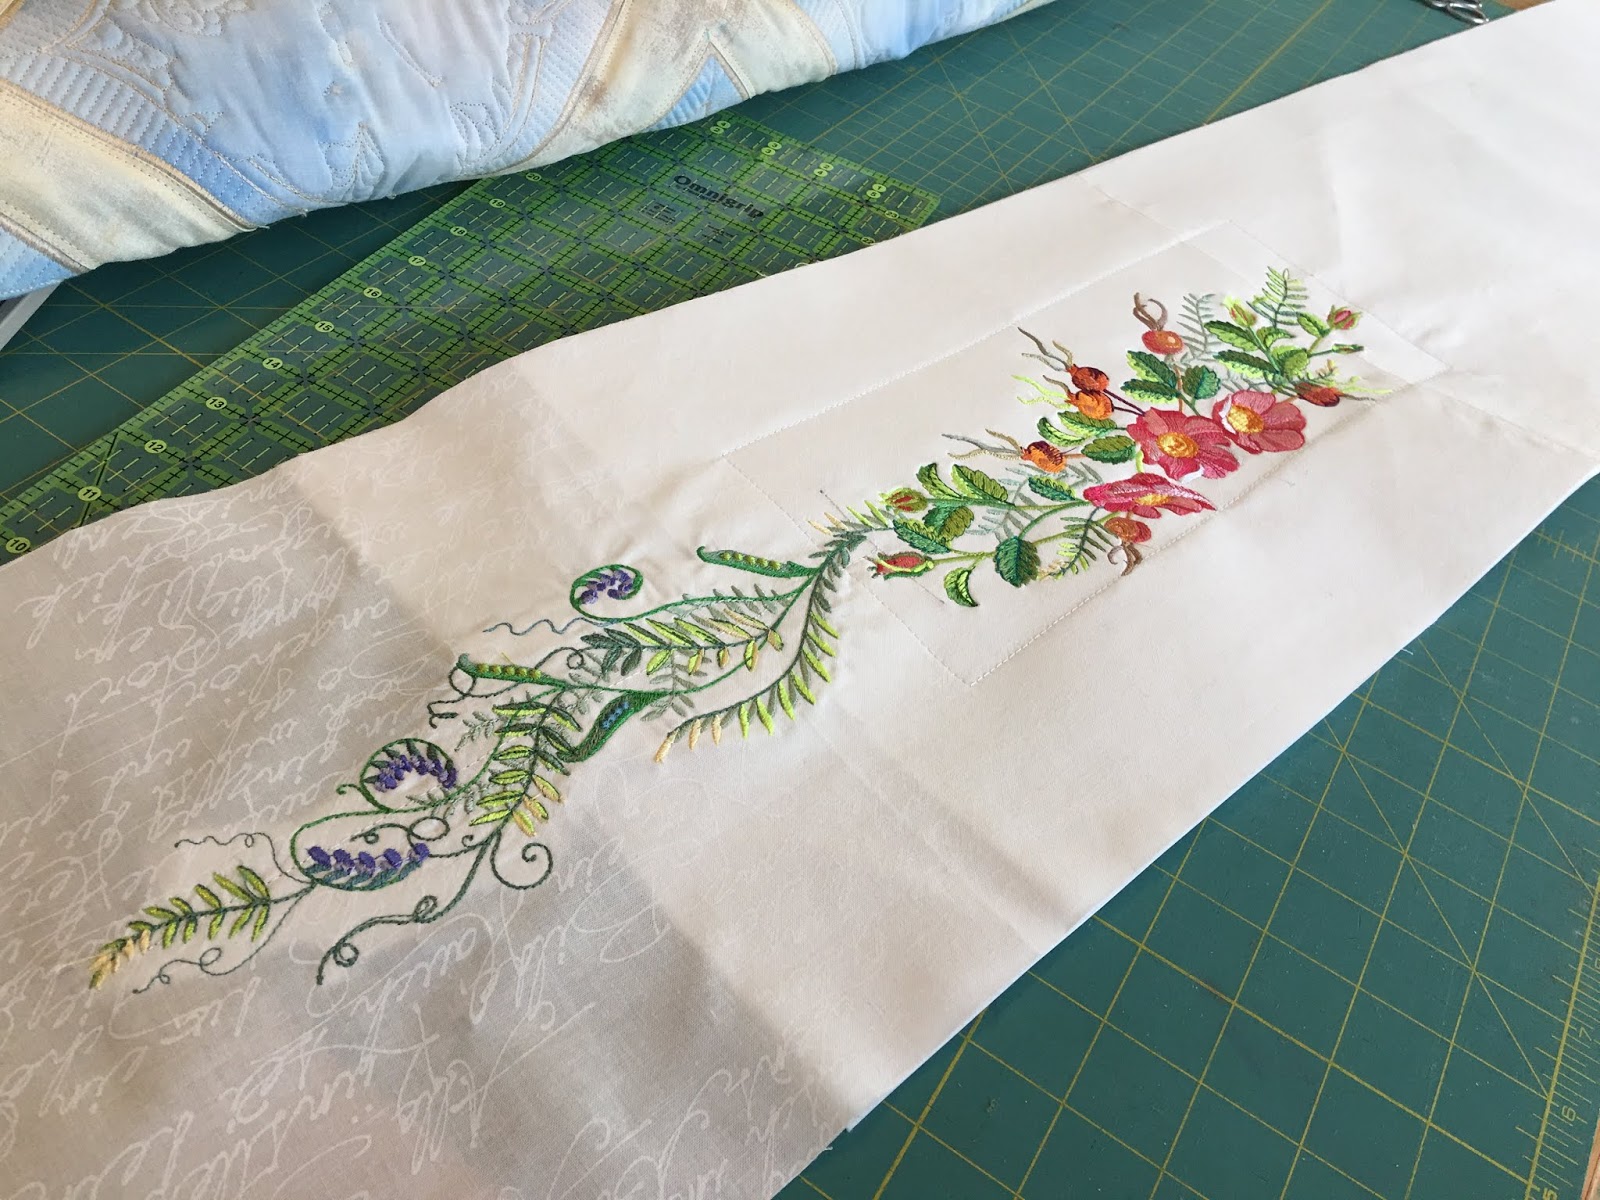
The piece will end up at about 55," so these are the L-O-N-G-E-S-T embroideries I've ever done-- three 11" hoopings each.

And I need four of them...


They feature a weed I used to try to get rid of in my garden-- 
until I realized how pretty it is. I call it
"Sweet Pea Vine"-- but it isn't. It's vetch or something. lol


Also featuring another of my favorite wild beauties-- 
the beach rose.


The third piece is the lattice-- I practiced this last year on my Cherry Zen piece. I am just itching to do it again on this one... in white, of course!

Last, the fantastically embroidered edging treatment is digitized and tested...


I just need 28 of them! LOL.

Put it all together, and what do you get?

This...


Or if you have Photoshop skills, this...


So that's the plan-- 
I confess I am having deja vu as I write this, so it's not the first time I've committed to finishing...

Let's see what happens!

I certainly hope, as Laura inspired me, you will pull out some long loved project and make some progess today. Together--

WE GOT THIS!

xox 
Carol

Friday, February 14, 2020

Happy Valentine's Day!!

We were so tickled with the way our Valentine Postcard came out, we thought that today we'd show you the evolution of a cross stitch design. They are sew fun to create!


All our designs have very humble beginnings... many on the back of envelopes, fast food napkins, etc. etc.  We've been told that an artist should always carry a sketchbook, but at least we have a pencil at all times!

You can (sort of) see our design will have a rose, a heart with chocolates, two cupcakes, and balloons.


Cross stitch, as you might guess, and graph paper go hand in hand!
So that is the next step. We don't always sketch the entire design in at one time-- just enough to get started.

The sketch is scanned in, and we digitize right on top of it.


The "Happy" was recycled from the Happy Birthday design... we're not fans of re-creating the wheel if we don't have to. You can also easily duplicate parts of the design... like make an extra cupcake. We don't like overusing elements, though, so when we copy and paste, we often change... like turning the second cupcake into vanilla. Chocolate loves Vanilla!


The design is then printed out and more sketching is done to fill in differently areas...


We go back and forth this way until we're in love...
as many as five or six times. Below, you can see how we make sure all the areas are filled nicely, with the balloons and the swashes that come off the "H."


The digitizing program seems very simple-- 
it's also set up like graph paper, and you just click the squares with the color you want, then add outlines for backstitching. 
Overall, some features were hard to master, like ordering the colors properly, and using 1/4 crosses, 1/2 crosses, and 3/4 crosses to completely fill a design. We have really grown in this regard over the past year!


When complete, the design has to be run through the regular embroidery software, and if there are mistakes, you need to edit back in the cross stitch software, so there is quite a bit of back and forth there, too.


On the plus side, it is possible to get a really good stitch out on the first try... unlike a Cloud Club bird or sea creature which can take 3 or 4 trials before they are perfect. <3

The Fairy Frost fabric color we picked for this was called "Cupcake," and that is no lie!! LOL


Then it is play time, 
to come up with some cute ideas to finish the stitchouts.


We always wish we had more time for this phase, to make pillows, tablerunners, placemats, and more...


But Happy St. Patrick's Day and 
Happy Easter are right around the corner, so we have to move on!

Have a LOVELY Valentine's Day!

Carol
xox

Sunday, February 2, 2020

Kris Kringle Wrap Up!

It's always great to actually FINISH a project...
Especially when you are 11 months ahead of schedule!


Those of you who know us realize we let our Christmas stitch-a-longs carry over into January. Usually it's so fun just to stretch out that holiday season and get through a month of bitter winter. This January has been so WARM with temps frequently in the high 40s, so we have to admit we're not feeling as Kringly as usual!


So let me ask... the point is, that NO ONE is embroidering by the time we would logically end a Christmas stitch-a-long, which is by December 25th. So do we try starting in September next year, to finish by Thanksgiving? Comment below if you an opinion.

Because it's just really hard to rationalize 
hanging these up right now. LOL.


Usually our finishing kits end with a border treatment--
this year, we decided to surprise you with a fabulous center medallion. The theme was "Christmas Carols," so the lyrics we picked for the middle kind of draw that idea all together.

Here's an early photoshopped comp of the final piece.


That's what we used to call the mock-ups we would make of brochures back in the day, in the world of advertising. 

"Comps." 

I was never sure what that was short for-- "composite"  maybe?
but here I am years later still calling them comps.

T

So the challenge of the center medallion idea is the same one we machine embroiderers face everyday-- how to fit it in a hoop?
(we know you all hate re-hooping, hee hee)
Working with Aida cloth sparked the answer.


 Multiple hoopings are just that easy with stiff fabric!
We just cut the cloth to size and made a couple of EASY markings on it. Stitch the middle lyrics, then load the border design. The first color change is a guideline that shows EXACTLY where to place your fabric. The second color change bastes it down, and off you go.


This was sew easy to do! If you are using soft fabric, just fuse it down to a layer of stablizer to make it stiff. You could probably just frame this as a gift-- it's big! about 10" x 10." Expect to see this multiple hoopings idea in more future pieces-- because contrary to what they say-- bigger IS better!

Now here's a tip to get your border embroideries to line up when stitching this all together.


Put the two pieces to be sewn face down on each other.
Stick a pin down in all four corners through both pieces-- don't secure them. Now you know that both pieces are perfectly aligned no matter how out of whack your cutting job may have been!
 With those four pins still in, take a couple more pins and secure the pieces together along the side that will be sewn... the stitch away!

Our rows came out super accurate and straight this way.


Aida is stiff, and this is the first time we've ever sewn it together. The seams are heavy, so we pressed them open-- the holes don't match. We love the way this piece is coming out, so we decided to it was worth the time to cover them up with a pretty ribbon.


We found a beautiful ivory ribbon, 1/2" wide, at Joann Fabrics. First, we glued them on and next we're going to take a little running stitch alog both sides to really smack those seams down. 


Someone asked us the question-- when do you decided to stitch these cross stitch design on fabric and when on Aida?
This is new to us as well, but my personal thinking is that I would use Aida for a piece I intended to frame, but cloth if was intending more of a quilt.

So it's off to the framer's for both of these, 
as we say goodbye to Kris Kringle!


Be sure to buy any missing charms or 4x4s soon for your collection! We're wrapping them all into one downloadable package this week and there will be a price increase on singles.
Click the link below.


Here's a sneak peek of this week...
Valentine's Day coming soon!

xox
Carol