Sunday, April 26, 2020

The Saga of Machine Embroidered Quilting

This is the story of a two-year battle to stitched digitized quilting designs successfully on my Flower of the Month quilt from 2017. 

It is long-winded and boring, except to a tiny minority of deranged proselytes in the cult of machine embroidery. (You know who you are.) There are very few pretty pictures. They are stern admonitions as well as high-flying experimentation that may result in addictive behavior.  Finally, you may enter an altered state of creative heights that may incur decisions damaging to your embroidery machine as well as quilts that you have spent an age on.

You have been warned.

So I teased my pictures of the perfect sashing stitchout on Facebook, and as visual artists, many of you didn't read and thought I finally got my magnahoop to work. Not so.


It was back to my trusty hoop. But before I get into that, I just want to say that the magnahoop really excelled, more so than my final method,  under certain conditions. Many of you seemed more interested to learn about that-- so I'll briefly describe it.

The MagnaHoop is sold by Designs in Machine Embroidery's Eileen Roche. (It's a magazine, and she has done a lot for this craft, so this purchase is worth the price of admission.)
This is the Magnahoop base-- 
you can start by just attaching it to your machine.


Then just lay your piece over it--
like, exactly where you want, even. 


You can see I put my needle down right on a mark I made, and was able to perfectly line the edge of my quilt up with hoop for straightness.


Then, just slide that magnetic top down under the needle-- these are SUPER strong magnets, and the set came with warnings, but at no time did I actually feel like I was going to lose a finger.

Then just stitch!

So if you don't like hooping-- boy, is this ever for you!
The problem is, when I tried to do it more in the center of the quilt, it slipped very badly. You can see above, the magna hoop at least has that one edge to hold on tight-- I can also successfully kind of hold the quilt on the other side to take the weight off of it while it stitches. In the middle, it is just too thick for the hoop to grab tightly. And I would have to kind of hold all four sides at once, with a mere two hands,  to "help it."

I had to rip out at least three stitchings-- never again.

I'm not ready to throw it out-- I did three side hoopings in ten minutes-- my new method take about a half hour each. And this week, I'm going to try stitching my "World Tour of Embroidery" design on it, just to give it a chance at a more normal embroidery situation, and I will let you know how that goes.

So now that the little flower "cornerstones" are done, it's time to move on to the larger sashings. They have to be more precisely aligned and have MORE tiny stitches to pick out if unsuccessful, so I needed a new way.


The design is 1-1/2" x 6." The first one I did (top) was "crazy talk." It has way too much detail and you can see the spine of the feathers is stitching too many times. Thank goodness I realized it need to be cleaned up before I might be in a situation of picking it out. (I'm either too lazy, or way too overconfident, to test it.)

Now to describe my "hoopless" technique-- that is what they call it. It sounds great, like magic, doesn't it? 
But you do have to use a hoop-- just not hoop your piece. 

I hooped two pieces of stabilizer. 
My first color change is a guideline that is just stitched on the stabilizer. 

(Obviously I have a big advantage to be able to digitize this-- but most embroidery machines have a basting feature--so you would use it. You would then just draw an X in the middle of the resulting rectangle to find the center of your stabilizer. The directions for your OWN design will be in italic in parantheses from here on.


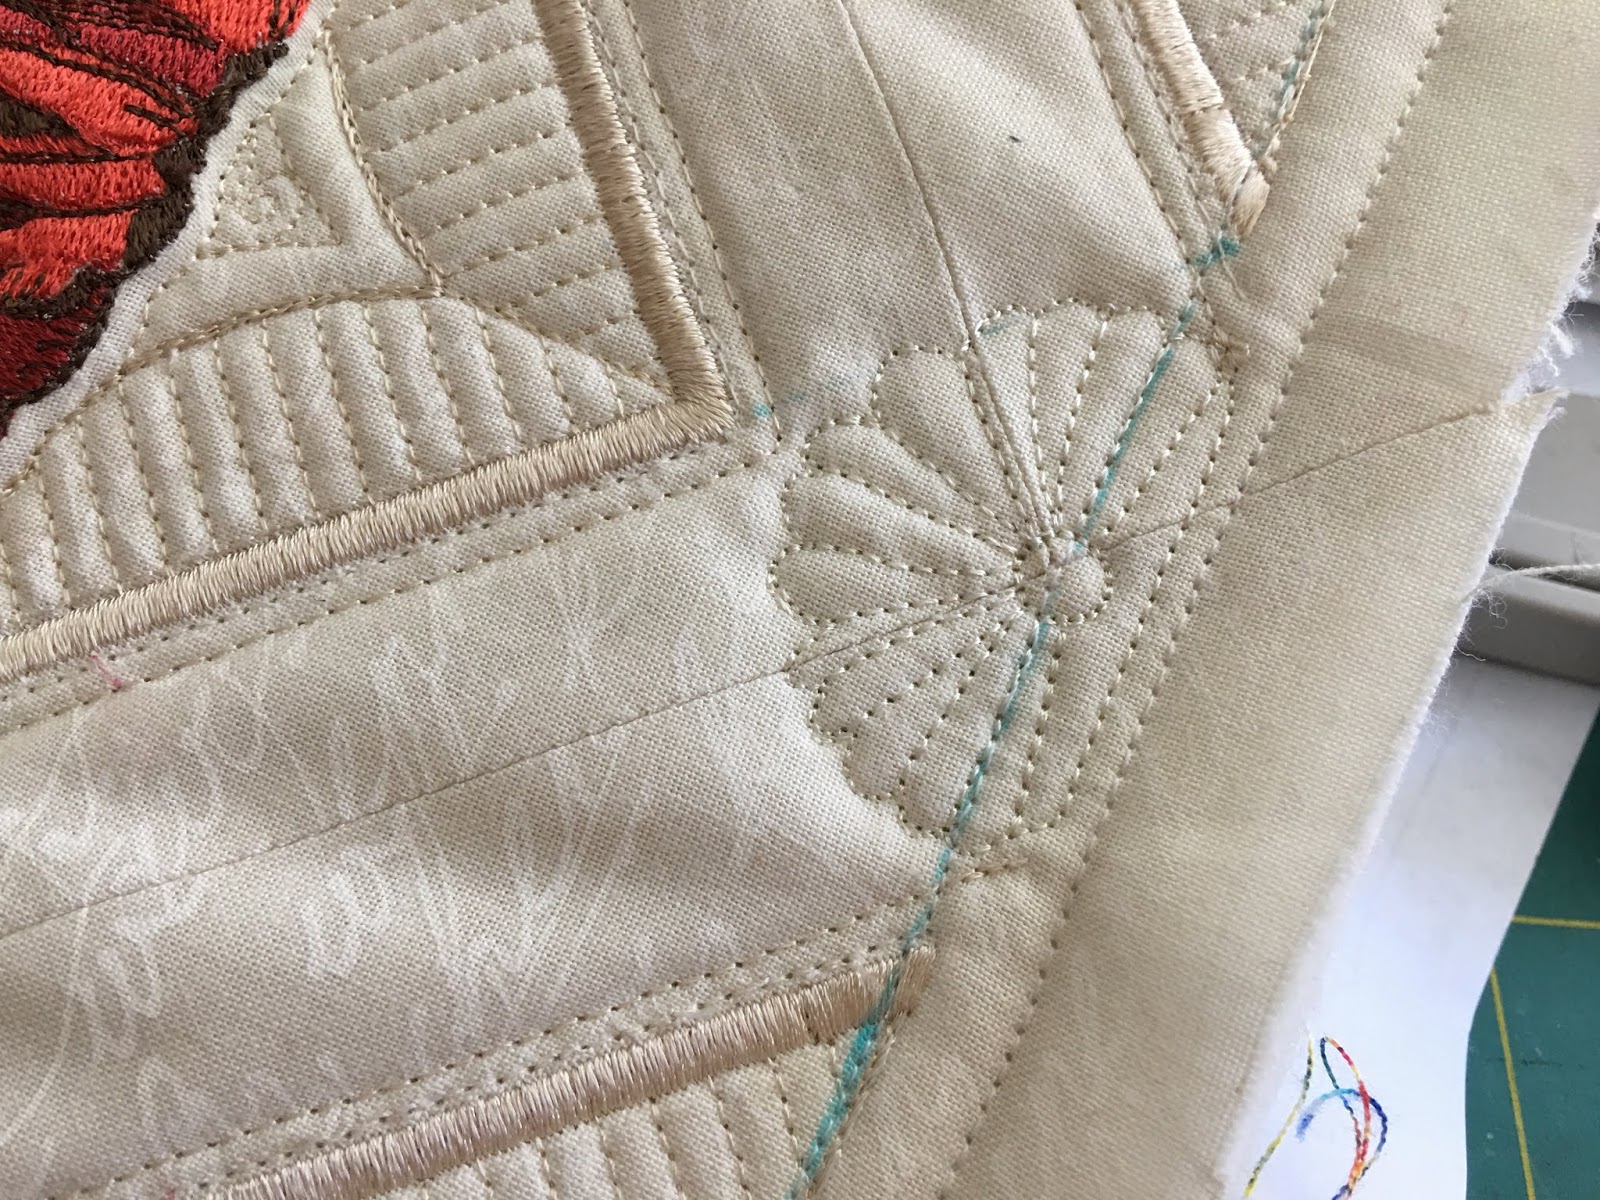
Next, I marked the design on my quilt. I just had to mark the short ends because the long sides occur where my stitched line are. You can see the lines below-- my favorite marker is the purple air erasable one, but I do also use the blue ones if I need the markings to last longer. 

(So if you have your own design and have stitched a basting line with the features of your machine, you would measure your design, and then draw the rectangle for it on your stabilizer, using the X you drew as the center of that new rectangle.)


Now use pins to secure your quilt to the guidelines on the stabilizer. This takes time and patience. One of those we have in plentiful supply right now-- the other is up to you!

Pin through a corner of the marked design on your quilt-- then insert the pin through the corresponding corner on the stabilizer. Don't secure the pins. Just leave them sticking through. Yes, I pricked myself a thousand times. Remind yourself, it is all for the beauty of the art. Do all four corners. Gradually, you will be able to get the quilt flat on the stabilizer, your pins will be sticking through straight, not angled, in all four corners, and you will be confident that the quilt is completely aligned with the guideline below it. I got better as I went along-- you will, too.

Once you are at this point, you will now put securing pins through your quilt and stabilizer while leaving those corner pins sticking in. These need to by AWAY from the stitched guideline-- so that is, in the very center of your quilted area, or very far away from the outside of it. I did three pins in the middle and two outside-- it was VERY secure. (See below.) You can now remove the corner pins.

(For your own design, you would move to a regular sewing machine, and baste your quilt to your stabilizer.  Yes, this is in the hoop and the hoop needs to be carefully manuevered under the presser foot- you can do this. The basting doesn't have to be prefectly square or 1/8" away, it can be anywhere outside of your quilted area-- it is just holding your quilt to the hoop-- it is not a guideline of any kind.)

At this point, we need a disclaimer-- you can see there is potential to sew over pins here! You need to know exactly where your embroidery machine is going on this second color change to avoid them. And once my color change finishes, my machine automatically moves to the next start point-- so I make sure I STOP it before the very end of my digitized guidelines to catch it before that happens. You could rip your quilt or damage your machine if the presser foot hits a pin. 
Don't try this at home if you are not confident!

I carefully reattached the hoop to my machine and ran the second guideline--it stitches 1/8" outside of the other guideline-- you can see it in pink below. It's helpful to do it in a little bit different color because you'll be picking it out.


Remove the hoop from the machine and take out all of the pins. The quilt is now secure with the stabilizer.

So now we can go ahead and run the quilting, right?

WRONG!

Only if you want your quilt secured to 2 layers of stabilizer with 1,000 microstitches!

So this is the innovation, I credit myself with-- I did think it up myself, but that's not saying that no one else ever did.

Flip the hoop over and carefully cut out the stabilizer between the first stitched guideline, and the second basting line. Remember-- the pink one is holding your quilt to the stabilizer and thus, the hoop, so leave it intact. 

Load the quilting thread in your bobbin and again attach the hoop. Now you can run your quilting color change and here are the final results, front and back:


All that is left to do is unhoop and remove the basting.

The results are impeccable, and to me, well worth the patience and 1/2 hour required for each. I have 36 of these to do in all, and just by doing a couple of them a day, the journey of 1,000 miles will be complete in less than a month.

So I'd love to hear your comments below. Even if this is something you'd never want to do, maybe I've inspired you to pick up an older project, try something new, become more confident in your skills, or think of creative ways to use designs you already have. Maybe you even have an idea for me to do this better.

The sky is the limit. It's in your grasp.

And finally, a pretty picture to thank you for sticking with it-- because the back of this is as truly beautiful as the front.


I won't have to be just imagining 
those pretty quilted sashings after all.


xox
Carol

Monday, April 20, 2020

Machine Embroidered Quiting vs. Freemotion

In the background of running San Francisco Stitch Co., I've also been attempting to fully and beautifully finish some of our monthly block program quilts. So to take you back in time to the beginning of the year, I was trying to machine embroider the sashings on my "Beaucoup de Bouquets" quilt so they would look perfect like the flower squares. It wasn't going well-- the quilt was just too heavy and thick for any of my hoops. I would struggle for easily 30 minutes to hoop ANYWHERE-- only for the quilt to pop out the minute I tried to attach it to the embroidery machine.

This is my photoshopped artist's representation of the finished piece-- it's lovely isn't it?

Just how to get there???!


I did buy a magna hoop, which was incredibly expensive, but seemed like the answer to my issue.
At first, it sure seemed like it was. Instead of having to hoop, the two pieces of a hoop are really strong magnets, so the piece is essentially laying flat and sticking together with
"magnetricity." (I'll coin a word, since I'm not a scientist.) The magnets are incredibly powerful-- just about to where you would lose a finger if they snapped shut on you!


Abracadabra!
I was able to machine embroider a cornerstone in five minutes!

I even digitized the half-flower 
needed for the edges and got half of those done.


Then corona crisis crept in, and I put it aside for a bit. So I got back to it this weekend-- and it was a disaster! I only have two full flowers left to do, and I did everything the same way, but the hoop was obviously slipping, and the design moved way out of position, like a 1/2", as it went along.

Instead of immediately hitting the STOP button, 
I watched incredulously, hoping it would self-correct.

NOPE!

I wish I had taken a picture of it, but I was so upset, I had to start picking it out right away. Thank goodness I was able to get all 450 1/64th inch stitches out in a little over an hour with no holes. You can still see where the center of my flower was when it moved-- a little spritz of water and those holes will close up I hope.


So what went wrong?  I think this quilt is SO HEAVY that unless I support the weight of it all around, it's going to tend to move around in the hoop. This flower was pretty much in the center of my quilt, the more successful ones were on the edges where I could support the weight of the quilt better as it moved.

So I am going to have to think this over now. If I had a regular hoop that could accomodate the thickness, that would be preferable at this point, because I'm really good at hooping. But I don't have that. So I'm going to continue with my edge flowers for now-- I will press the STOP button alot quicker if needed... and brood over how to get those center pieces done.
Tape the quilt to the hoop? Pin it?

I still have about 36 sashings to do after the flowers are done (the flowers are the cornerstones)-- placement is going to be a lot harder with that, and there's five times the number of stitches to pick out if they shift.


SO this brings me to why I bought this beauty last August...


It's a 22" Innova longarm with a ten foot table!
A major expense-- needless to say. My last baby left the nest so the room presented itself. First of all, I thought I could easily just freemotion sashing areas of my embroidered quilts to finish them more quickly to quilt show quality. Then, I also thought, I could finish up the DOZENS of pieced tops I have laying around instead of leaving a legacy of UFOs. And, last but not least, I thought I could contribute to the betterment of humanity for a change with some charity work.

No, I do not ever intend to do this for hire as I am frequently asked-- embroidery will always be my first love. 

<3


It is SO FUN and relaxing to work on it-- (as opposed to struggling with hoops). The Innova is really is a beautiful, effortless machine. This is my third piece on it, and I'm already producing passable quality work. Meaning, I can whip up a nice gift or charity piece in a short amount of time. Show quality--NOT-- and I'm not sure if I will ever get there, while knowing the flawless results that machine embroidery affords. 


I have a bit of an edge after sitting and digitizing machine embroidery quilting-- it really helps to not have any stops, and to move from one shape to the next with having to stop and break thread. If you can't draw it, you won't be able to stitch it-- that's a maxim I have heard more than once-- so this shows my little diagram of how to make a rose bud border.


I just did the most simple markings with a nickel and a clear ruler.


The fabric was "Caroline" by Brenda Riddle-- I don't remember the exact pattern name but it was one of those Schnibbles charm pack patterns. It's a pinwheel within a pinwheel which was not complicated to do, and two borders. I used two charm packs. I'll post a full picture when I finish the last border this week. Schnibbles charm pack patterns are the BEST, by the way.

So that's what I have to show for a weekend with two kinds of quilting. Hopefully at some point the two methods will work together flawlessly, but that's pretty far off in the distance.

In the meantime, I'm just having fun.

xox
Carol

Thursday, April 9, 2020

Cloud Club Final Layout...

I've always said that the most joy I get out of this little business is seeing what YOU make from the designs! And every so often, you send me wonderful pictures. This arrived in my inbox yesterday, completely out of the blue-- and I have to tell you, I was in such rhapsody there was no living me for the rest of the day!


This is a finished Cloud Club quilt made by Sarah from Michigan!

Well, not just a quilt but pillows and wallhangings, too!

I honestly have no words for this, because it is completely beyond anything that I, myself, was going to make.


Truthfully, I never saw these designs as something you would put on a bed, but Sarah hit it right out of the park. Look how perfectly the original set of birds sits on top of the bed-- then a perfectly colored friendship braid meets the dropover (I would never have thought of that). Finally she uses multiple hoopings of the feather blocks for the overhang and a pillow tuck. It's just unbelievably lovely and I hope she enters it in a show!


Sarah, you made my day!

Not only that, but I'm seriously inspired to now finish up my own quilt-- I think it would be a lot less work!

After the first year of the Cloud Club, this is where we stood:


No one enjoys a square design more than me, but something was feeling not right about it-- that, and everyone was really enjoying the birds. So I planned another layout that added two more rows and need five more birds-- that was Series Two. I've been promising a new layout for awhile now-- well, what am I waiting for, now that we're all stuck home?

And to answer that question--LOL-- what I personally am waiting for is all of my birds to get finished! You might find that surprising, but at least four of mine need to be redone for various reasons-- forgot to put the same color of quilting thread in the bobbin--backing fabric corner flipped in and got stitched into the design-- yes, these things happen to the best of us! Here is where my blocks reside for now.


I have to admit it hurts me sometimes when I think that instead of a finished and gorgeous quilt, there's just a box of odds and ends!


If anything ever happened to me, 
no one would ever know how to finish it!

And at the risk of sounding like a pompous idiot-- these birds are all so heartbreakingly beautiful.


Most of all I have to thank Sarah for a push-- the Cloud Club birds are out of the box and it's time for them to fly!

My original idea was to layout the birds in seasonal order-- starting with January, and ending with Christmas. So I printed out a sheet with all of them on it, so I could easily shuffle them around to add the five new birds as the seasons pass.


The mockingbird has cherry blossoms-- that's early spring, so I put that after the robin. The meadowlark and wood duck were more of a summer scene. Woody the woodpecker had fall leaves-- and finally the cedar waxwings were full on winter. 

Here they are laid out like the quilt would be:


So then, of course, there's the fine tuning-- I'd rather have two of my favorites in the middle. That's the mockingbird-- the sewing machine is SEW ME! and the California Quail because, well, you know. So those were moved into the middle slots, then I split up the oriole and the hummingbird which both had a lot of orange and a little tweaking with yellow. Usually I like to have things facing into the middle, but since the blue jay and robin both face out-- it has a nice balance and really doesn't bother me. 

FINAL CLOUD CLUB LAYOUT

So there it is!  Sorry the image quality is not the best-- it's a gray one here today-- but if you right click on the photo and select SAVE IMAGE AS, you can save it to you computer and print a big one out on 8-1/2" x 11" paper for reference. There's no "right" layout-- so pick the ones the are most meaningful to you for the middle-- and you're under no obligation to go by the seasons as I so love to do.

So, there's no time like the present for "production sewing" as I call it-- I need four corners and ten feathered side triangles-- that is really not too many compared with Sarah's version. I hope you feel inspired to bring this project out of your closet and wrap it up-- you can take 25% off any of the birds or finishing kits with the coupon code keepcalmstitchon through the end of April.

What are you waiting for?

A Christmas Cloud Club quilt is 
definitely in my mind after this one!

xox
Carol