Monday, June 19, 2017

Bits 'n Pieces


Since the big finish of A New England Album, how long did you think it would be before another project got started... or two or three or four? What’s worse, my favorite embroidery machine is at the shop for a clean up, so opportunities for quilting now abound. Here's a few peeks of what we've been piecing together this week.
Here is one of the projects coming along for the Summerhouse BOM. If you don't know, this is San Francisco Stitch's first quilt block of the month-- no embroidery-- and we are very excited about it. We have a quilt block each month AND a themed project. This lighthouse block is one of our favorites, and what would be better than to have one hanging over your bed? Sweet dreams, guaranteed.

And how about a fence for Le Petit Jardin finishing kit? Our center is all pieced together, (Did you get your free tutorial?) and now we are going to embroider an arbor gate and maybe some bunnies and climbing roses to surround our vegetable gardens... stay tuned.


And since we’re on a nautical bent, this is my challenge quilt I mentioned last month when I got stuck at the airport for six hours! This is just a little 25" square piece that is for my local quilt guild's show in the beginning of August. To enter the challenge, it needs a star, the colors navy and lemon yellow, and a sea theme to be eligible for the contest. One of the themes suggested was John Masefield's “Sea Fever” poem. I was forced to memorize and recite it for a speech class in tenth grade... it did not go well, and I’m still not over it! But when I saw that it was on the list for a challenge theme-- I truly impressed myself with how much I remembered. Like where are my car keys and cell phone, though?

And, of course, the poem is going to be embroidered in the border, because no quilt is ever complete without machine embroidery.
So, the clamshells are finished for the water, but I told myself if I don't have a star by the end of the month, it will never be done on time. Stitching up one of those big mariner’s stars is on my bucket list and paper piecing is really the only way to do it. I really don't mind paper piecing, but don’t do it often, so every time I do, it seems like I have to relearn it all over again. 


I drew the star in Adobe Illustrator and printed it out multiple times. The points are pretty extreme even for the precision of paper piecing. But I only need half a star for the corner of my layout, so I made nine of these when I really only need four, thinking I'd get some perfect ones. It seems to me, you don’t sew right on the line, but a thread's width into the seam for perfect results, but I do have to figure this out every time. Here's my best one—not bad!

We live near the Cape Cod Canal and this week, the tall ships all came through for Sail Boston. Inspiring to say the least, and a good omen for my challenge quilt! This is the Oliver Hazard Perry out of Newport-- I found out later it was built fairly recently. How wonderful that there is still enough interest and know-how to keep these gorgeous ships on the water.

Finally, this is the beginnings of another challenge quilt... a challenge that tickled our fancy, but our lips are sealed, just until the likelihood of finishing it is more certain. The deadline is next April, so this one will happen mostly over the winter, and we are using our coffee art mug rug GIANT SIZE in it-- (it's going to be a celebration of caffeine).

The first thing we really need is 156 of these "snowballs" for the borders... its relaxing and fun to do them at night.

So that's just a little bit of what we've been up to... Thursday this week is a quick trip up to Vermont Quilt Festival to visit the New England Album and see how it fared. Look for our next post as we take the road trip up... its absolutely our favorite summer show, and there are quite a few sewing stores on the way!

XOX

Tuesday, June 13, 2017

There's something GRANDE in Le Jardin!

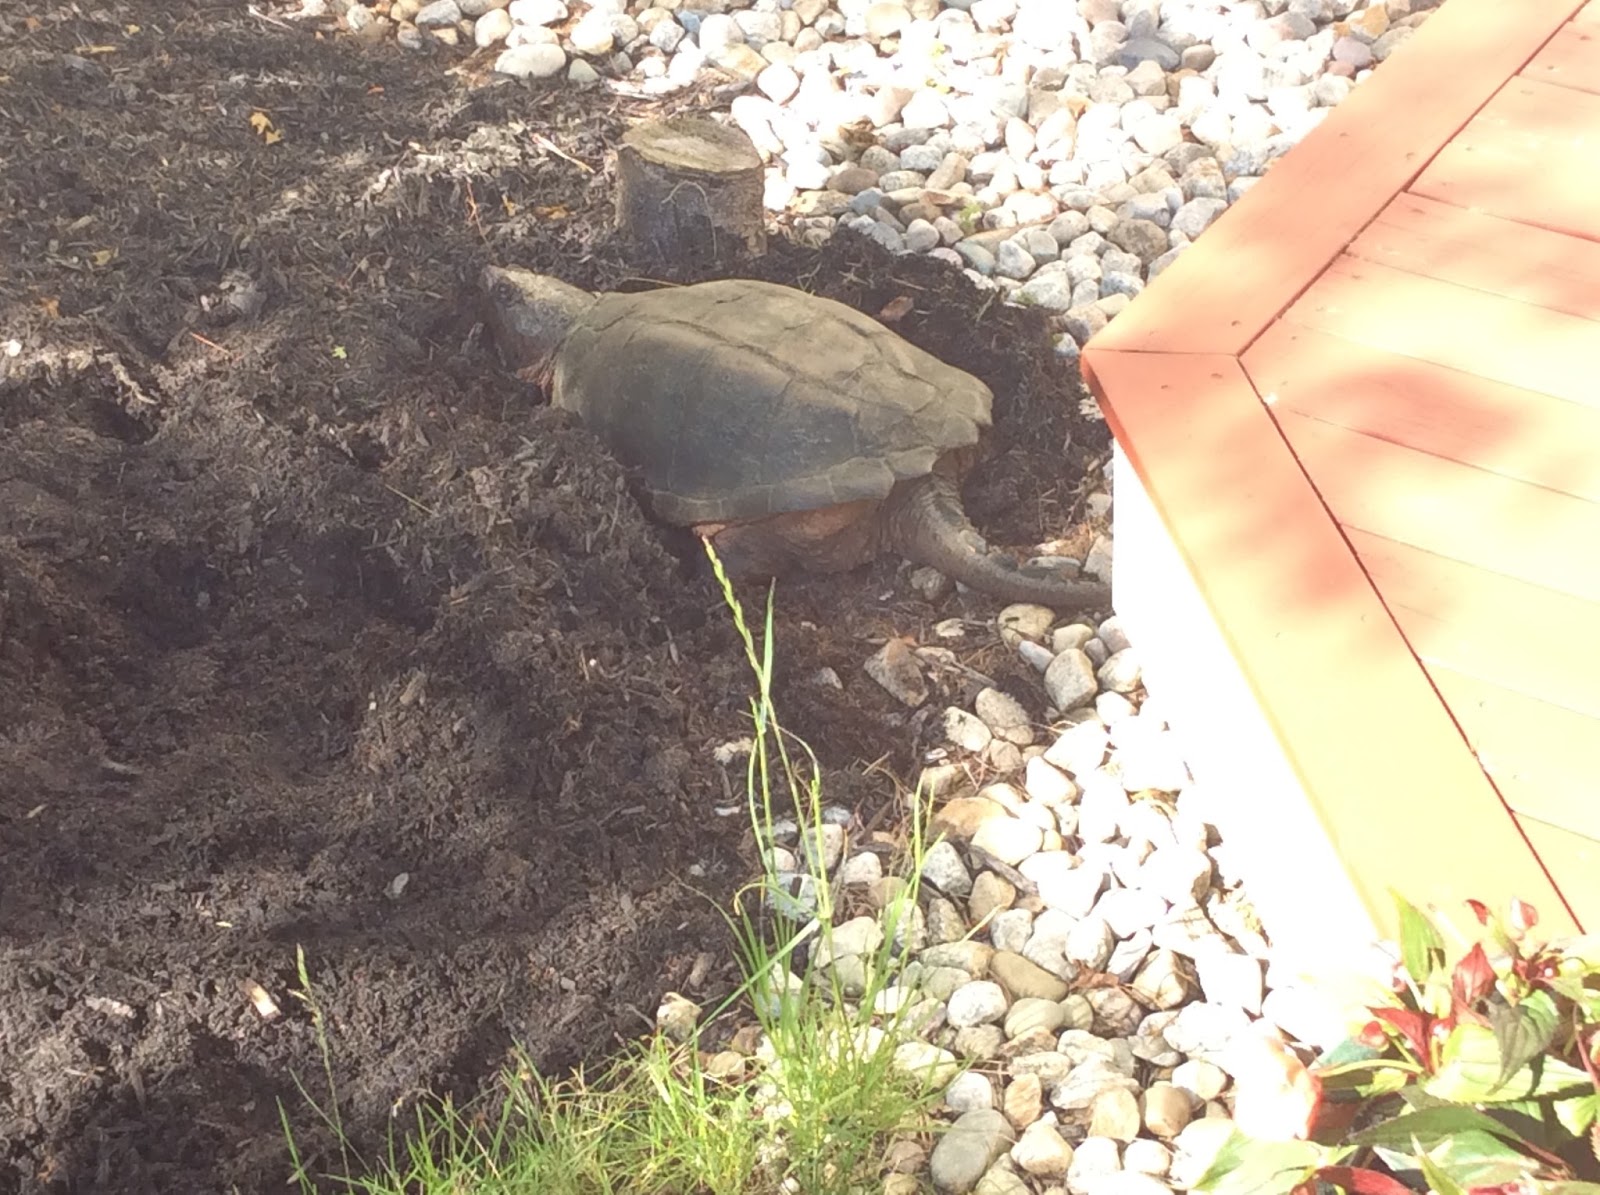
Since we are wrapping up "Le Jardin Sow-a-Long," I can't resist sharing this cute story about what's growing in my REAL garden!


Last night as I was making dinner, my husband ran inside and yelled, "Grab the camera, and come outside RIGHT NOW!" I love surprises and when he saw the look of delight on my face, he added," You are NOT going to be happy!"

Well you'd think a person would know you really well after 34 years of marriage, but instead of being unhappy, I was EGG-STATIC!


This beautiful prehistoric beast climbed up a 100 foot cliff from the lake behind our house and picked my yard to lay her eggs...

I knew my garden looked nice!

So still thinking I was not happy, my husband started to think of various ways to get rid of the creature, all very unwise. It wasn't any ill will towards the turtle, but just that he knew I worked so hard to plant caladium bulbs in there, which may or may not have ended up as a turtle snack. I finally convinced him to leave it alone... he didn't understand that when dealing with a MOTHER, you could throw the thing in the car drop it off six miles away, and even if you were still in possession of all of your arms and legs, she would be back in the morning. I assured him, that to hide the eggs, she would put every last bit of mulch back where it belonged, neat as a pin.

I only took one picture out of respect, but I was able to peek out of a window and watch the progress... it took two or three hours but the size of the hole she dug was impressive,  at least a foot deep. Thinking we still had time to go before the magic moment when the eggs were laid, we went for a walk and when we came back she was gone.

The clean up job... not so much.


I walked around the back and there she was... resting. She finally got up and walked (I thought turtles scooted along) into the woods. She seemed tired but at least it is all downhill from there. I laughed when instead of going around the bush, she decided to just plow right through it! A creature after my own heart. XOX


A quick Google and I discovered the babies will hatch in 80 days...that's as close to a grandma as I am for now! So that's what's growing my gardens... what's growing in yours?

Wednesday, June 7, 2017

Adieux...

"A New England Album" shipped out to Vermont Quilt Festival yesterday! UFO no more. I couldn’t be more pleased...


At the end of this year-and-a-half journey I feel nostalgic, so read on for some finishing tips, mixed in with some metaphors about life, or just quickly scroll down for some detail photos and be on your way.

The reason this project started was because I always wanted to make one of those beautiful, hand turned Baltimore Album quilts. After years of trying, I had to face the facts-- I STINK at hand appliqué. None less than Karen Kay Buckley, Mimi Dietrich, and Rosa Rojas all tried to help me with all manner of scissors, papers, and glue to no avail. So I realized the only way I was going to get the "look" was by digitizing machine embroidery. The lesson here is, if you lack something, consider it an opportunity to find out what you CAN do!


The final product is better than I envisioned... the piece just seemed to happily come along bit by bit and became what it wanted to be. Fat Quarter Shop always had an extra piece of the backing fabric when I ran out, no coffee spills, no epic embroidery machine fails when I left the room. In just looking at it as if seeing for the first time, it reminds me of an ancient pictogram, or a medieval tapestry of daily life. And as ironic as it is, it’s made on the cutting edge of computer aided design.


After finishing the large borders, there was an empty space between the blocks and borders. I decided to fill it with "pearls" and "rope" embroidery and added about another 40 hoopings for myself! I had to use a smaller hoop to get more control over stitching them on straight. Little by little at night did the trick and the embroidery was finally done. A great feeling to take it off the machine for the last time!

I struggled with the idea of washing and blocking, but it really needed it—as flat as it was after all those hoopings, it did have some noticeable hills and valleys. The fabric was not prewashed, but the colors were so pale to begin with, so no fears there. It was all those fire engine red embroidery threads from every manufacturer and country on the planet that worried me. I googled how to best do it... while some used the washing machine, EEK!, adding a tablespoon of Dawn to the water was a common theme. Dawn is said to contain a chemical that does not allow the re-depositing of loose dyes. I threw in three color catcher sheets for good measure and used really cold water. All those thread dyes held fast!


Then, to dry it quickly, I did put it in my washer for the delicate spin cycle—I stood and watched as my washer slowly built up to full speed. I could only stand it for a about a minute, but it really did really get much of the water out. The piece was alarming shrunk now, but I pulled and pinned with about 450 T-pins to a foam insulation board,  and bought a $14 laser level (it shoots out 2 perpendicular lines) to square it up-- well worth the money. Then it was fans, fans, fans. It was mostly dry in about 6 hours, but it took a solid day for it to be bone dry. The results were utterly fantastic—I never thought my thin white borders could be that square. I will be blocking ALL of my work from now on.


Binding-- this is only the second time I have done scallops and it requires more patience (I have an abundant supply) than skill (sometimes  in short supply here)! I tested so that the width of my binding PERFECTLY touched the satin stitched edging on both front and back. I also took the project on and off the machine for every scallop. As a reward for the patience, my pleats formed effortlessly on their own. You really couldn't tell which was front and back on this...


Crystals... Back in the day, my daughter was a figure skater for ten years. She never made the Olympics, but opportunities for sewing were abundant. There was a saying: If you can’t dazzle the judges with your performance, blind them with crystals. I can't deny there's a bit of that philosophy here!

Whether or not to crystal the New England Album was a topic of dinner conversation on quite a few nights... at least one family member being adamantly opposed. I am sure the fine arts community would be appalled, but they would also consider this a demented craft project anyway. Art or craft? I was at one time insulted by this question, but at this point in life I really don’t care how my work is labeled anymore. All I ever wanted to do was make something beautiful. And I wanted crystals. 


I bought the first crystals in Michaels... they have a good selection, but then, since I needed over 500 of them, I ordered them for a fraction of the cost from Fire Mountain. Warning: Fire Mountain has so many colors and sizes, do not go to their website unless you know exactly what you need! 

To glue or to hot fix? I tried the glue for the first time-- easy to do, not as messy as you'd think. I used a pin to just apply a tiny dot of glue to each crystal... you can still pick off the crystals days later if you have a change of heart, leaving just a tiny bit of residue. But I still prefer hot fix-- just lay the crystals down and heat for about ten seconds. I'll let you know how many fell off of each method when the quilt returns! 

WARNING-- it is really hard to know when to put that Bedazzler tool down-- apply one crystal in one place and you are then committed to doing two or three hundred  in all those places! Use caution!


And the label… a beautiful machine embroidered one, of course!
I saw the words “wrought by” on an 1800s cross stitch sampler and they forever resonated with me… there was definitely some “wringing” here… it also reminds me of wrought iron and I did have a will of iron to finish the thing...


Some say the best judge of needlework is that back…


So after a year and half of work, “A New England Album” is now done, rolled up, and entrusted to UPS to take it to the Vermont Quilt show and who knows where else after that.  I can't deny a ribbon at any of these would be a thrill, but I've learned that to be a very random occurrence and have probably already won more than my fair share. I sometimes wonder what the purpose was to pour all this love into 2000 square inches of fabric,  into a quilt that is too stiff to provide any comfort or ever warm a loved ones shoulders… but I hope that it will still warm many hearts.

I am now sweeping up the dust in my sewing room, and enjoying not having a project for a while… knowing me, that won’t be for long!!


XOX

Thursday, June 1, 2017

Nautical Flag Border

    When finishing up our Summerhouse quilt, we wanted to do something special for the border. A Nautical Flag Block had hit the dust for being overly complicated—but the potential for a border really struck us!


    It surprised us initially that they all seem to be based on quilt blocks – but thinking it over, DUH!, in the days before cellphones, radios, and even morse code, what did sailors have for communication? Not much more than strips of fabric and needle and thread. And you’ll notice, the rolling deck of a ship is not suitable for curved piecing—only ONE block uses it—can you find it? And I’ll bet they didn’t have Karen Kay Buckley’s perfect circle templates, either.
    Don’t worry—no circles in our border—and you will be surprised how easy it is to put this border together and make it fit. If you want to skip that blather, you can download our instructions here:

     Our Regatta table runner was crying out for a flag border. We started by adding a 1/4" navy blue border around our ships-- a flag border is nothing if not BUSY so think about it as a bit of visual protection for the main part of your design.


     We are using three inch blocks, the perfect size for a table runner.  We’re sticking with our teal and yellow theme, so we pulled a bunch of scraps in those colors. Most of the flags worked out to have pieces with a 2" width. So, the first thing we cut was a bunch of two inch strips—many of the flags also use a 2” x 3-1/2" rectangle, so we cross cut some of those, too. 

     
We calculated that we’d need roughly 32 blocks, so here’s our strategy. Make ALOT of easy blocks and then make a couple of very high contrast fancy blocks to add interest and get a good mix of colors and shapes. 
     First up, “K”: the simple double-striped flag-- so easy to make so we made eight of them, picking a light and dark value fabric for each and using our pre-cut rectangles. Then we made a bunch of flying geese, and stitched them to more of the rectangles.The checkerboards used strips that were then cross cut and rotated—very easy to do as well.


     By this time, the scraps were flying...  getting tracked around the office like mud... and we can only hope there are no pins in there. My husband always says in my head, “Hope is not a strategy.”


… and here is my scrap catcher strategy-- my friend Tere, who is fully acquainted with "my process," made it for me out of my very favorite Kaffe fabric.... when she gave it to me, I initially thought it was to keep fat quarters in. I don’t know why I thought that, but even as a child I was trying to put the square block in the round hole. 
    Tere graciously corrected me about its true purpose, but I’m still having trouble using it. But it looks great on our big cutting table, doesn’t it? Until filled with scraps, you might think it serves no purpose there-- but it has an important one... Its purpose is to remind me I have a dear friend who sees a void in me and tries to fill it. XOX

     Back to business... we just made of few of these types of blocks below… not that they were so very hard to make, but just because we were trying to expedite the process.


     Why use a design wall when you can have a design floor? A design wall is for people with good shoulders.... the floor is for people with good knees. If you don’t have either, try a table.

     We reached 32 blocks in no time. We first picked four of the most striking favorites for the corners. Then we just picked one by one from each row, and laid them clockwise around the piece so that none of the same fabric was adjacent—harder to do than you might think!

     
Once we had our first layout, it was very helpful to take a black and white pic with a smart phone-- you can easily see where dark and light values are congregating and adjust. We made some adjustments and this is actually looking pretty good now.

Here’s the final layout:

    We sewed together about 4 or 5 blocks at a time, leaving a space in the middle of the top and bottom borders... the space is to add a final piece to make the border fit! Our sides worked out perfectly, but could have used the same technique. If you only have a small space to fill, just remove one of your rectangle pieces and make one that's wider.
    When sewing on your borders, pin the ends to match first, then pin the middle, then in between those pins-- keep doing in betweeners until your pins are about 2" apart. Pin on the border side of the project-- that way you can better see where points are when you sew. We first added the longer borders and then the sides.
Having all those flags butted up against a binding seemed like it was really going to cramp them, so we added an additional dark border around the edges. 

    And ta-da! Photoshoot time—my favorite! We bought a matching blueberry pie and lemonade—yellow and blue! Unfortunately, it has been raining here forever, so the picture couldn’t be taken outside and was photoshopped a bit. Maybe we’ll get another pie later this week and redo it.

So that’s the nautical flag border—again, you can download a PDF here:


Feel free to “pirate” it—for all of your summer projects! XOX

Wednesday, May 17, 2017

Sedona

I did something unusual this month-- I took a vacation! Now you might think that having my own sewing business is vacation every day of the year and you'd be right, but sometimes the artist in me needs to get out from behind the computer screen! 

For my sister's birthday, we met in Sedona, Phoenix-- she picked it and I happily agreed. She was flying in from Florida and we were supposed to land within a half hour of each other in Phoenix-NOT! She had two layovers and made it on time-- my straight flight was delayed four hours! Fortunately, I have the presence of mind to always travel with hand work...


(This is a secret project I am working on-- English Paper Piecing clamshells-- more in another post, and boy, did I get a lot done!)

So getting in very late, I missed my trip to the Desert Garden in Phoenix. Sorry, no cactus flower embroidery inspiration! :-(

...and basically we were up an at 'em to drive up to Sedona the next day. 


Born and raised in the Northeast-- there's always something enchanting about cacti growing by the side of the road. And while I think of Arizona as a flat desert, its actually quite mountainous-- 99 degrees in Phoenix but we still had a snow peak up ahead.


We stopped at the famous Montezuma Castle site-- what struck me was how PEACEFUL it was there. Located by a little stream, I could just envision the Native American women of ages past doing their sewing by the lake. XOX


Then it was back on the road-- as we drove around a last mountain the red rocks came into view and they were stunning.

The first night in Sedona we went to the Tillakawapakawa Center, and trust me, it is WAY easier to spell than to say. It's a place loaded with art and galleries. Many many beautiful things to ogle and fortunately the shops closed early or my credit card would have been smoking! The buildings all looked pretty new, but everything was arranged so carefully like a little village and every spot was like a work of art, too. So my camera got the workout!!


Next day we hiked up to the Chapel of the Holy Cross. All uphill... this place does not lack gorgeous vistas! 


Unfortunately, I got distracted by this person's house that could be seen below... In a former life, I may have been a real estate agent, because a pretty property and location, location, location, never escapes my eye!

 It had a pond, waterfall, and God only knows how many bathrooms... basically, the only fault is the fact that stalkers with zoom lenses will be spying on you from the Chapel!


This is my sister--  we are blond and brunette versions of the same person and a better traveling companion you will never find. She is very much agreeable when ill-advised side trips are in discussion, also will want to buy you any and all items that take your fancy in gift shops. DO NOT wear mascara with this person, as you will soon have tears rolling down your cheeks from laughing too hard! She does need to work on her rock star hand signal though. XOX

At night we shopped at the more touristy area-- I am a sucker for a gift shop and don't mind the tourist traps at all-- I just love to take all of it in, see where all the visitors are from, and have the locals tell you the best things to do.


Of course, I assured my sister quilt shops were off the table, but this one was a mile down from the hotel, so what the heck! Taking me into a quilt shop is as ill-advised a side trip as they come.
Well worth the visit-- they had four rooms, beautiful batiks and a nice selection of red rock applique patterns.


Day Four 
we drove up to the Grand Canyon. The elevation is 7000 feet-- 
so to get there from Sedona, it is a climb-- first we went through the Oak Creek Canyon-- a narrow shady crack with trees, a creek, the most charming cabins, and as cool as the day was warm. Then you switch back and forth over a great hill-- the views as you went higher and higher were spectacular... it was my turn  to drive though, and  BOTH hands were firmly gripping the wheel, believe me! So no pictures!

While admiring the incredible sight, I thought to myself-- it's really not a big hole in the ground-- the bottom of the canyon is at an everyday type of elevation- it's the surrounding cliffs that are spectacular!


Both times I have visited the Grand Canyon it has just been for a day. I love a hike and I have vowed both times to return and walk down at least partway. This first time I went was in February and this time I noticed how much greenery there is down there-- we could not see the Colorado River at the bottom. 


Then of course you see something like this and you realize it's time to get back to civilization and... HOME.


Back at home, for the flower basket of the month, I went with this favorite mountain flower and a jar that probably seeped into my consciousness at Tillakawapakawa. Thanks for joining me!
XOX