
My "FOREVER" project is a kit from Keepsake Quilting about 20 years ago-- it was called "Baltimore Out of the Box" by Dinah Jeffries and I'm sure some of you old time quilters will recognize it! I am proud to say, after all this time, I have about nine blocks done.

The ones that are left are the harder ones, or ones I didn't like as much. I just pulled out "Spring Promise" which is at the bottom of the pile because... it has a butterfly in it.

I don't like butterflies.
They are just too overused and used badly so often... so while I work away at the leaves and flowers, I am thinking of changing it out for a dragonfly, my winged insect of choice. Or, since I always thought I was making this for my beloved son or daughter's wedding, I could leave the space blank for the names of the happy couple. (No, nothing is on the horizon yet, and I'm good with that, because I still need time to finish this!)

My previous nine blocks are like a short history of applique, as I used the techniques that were popular at the time, over the years. I did the leaves with Rosa Rojas' Appliquick tools-- I like them very much. The petals are supposed to be dimensional though, so I thought the technique where you sew the shape to a backing and then turn it, might work better. So here goes-- I need about 60 petals.
First, I double a scrap of fabric over and using a very tight stitch, made this petal shape. The bottom is left open for turning.

Then, I cut them out, a scant 1/4," and clipped the curves. I read that you should not make angled cuts, or you will get angles in your curve when turning; instead make "swooping cuts" and so far I agree, you do end up with a smoother curve. My stitching is tight enough so that I don't think the seam will open up. It occurs to me, as the machine embroidery queen, I could digitize a file to stitch this, and I may end up doing that to speed things up. The curves would be PERFECT!!

Then I turn them right side out-- I love this Clover turning tool. They look like little finger gloves--LOL.


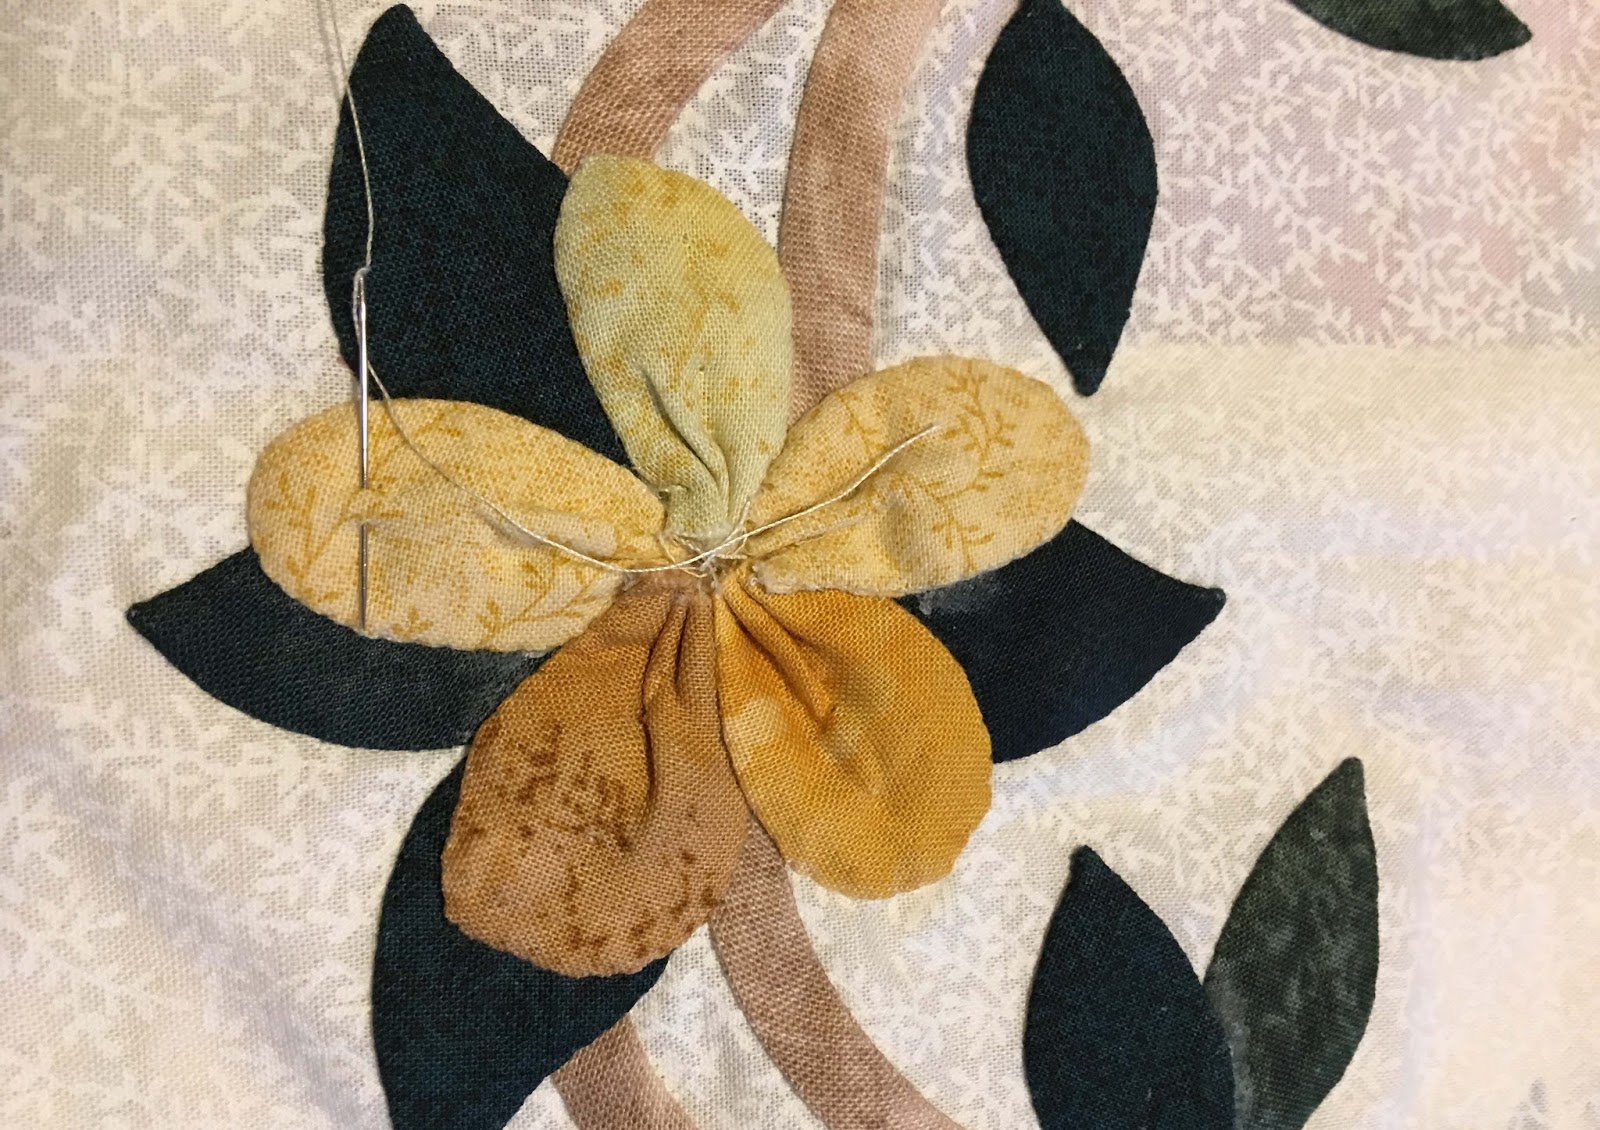
Now I pick five assorted colors to make a flower and gather them all together at the bottom to make a five petaled flower-- see the finished yellow one below.

Let's talk tips. Over twenty years, my handwork has improved, and the switch to the Clover Black Gold Needle is the single biggest reason why. For needle-turned applique, you are supposed to use these honking long needles to help you--never helped me!! This little needle is about an inch long, and the CONTROL you have with it is amazing. It is also extremely sharp, and goes in right where you want it. WARNING: It takes a while to thread it!! heehee. But it gets easier.

Time to sew, and you can see I have ond flower down already. MORE TIPS: use a thread color that exactly matches your applique fabric. Use a THIN thread-- 100 wt. silk is wonderful-- I don't have the budget for an entire set of silk colors, so I have this 40wt set from Superior-- it's fine. Thread Heaven really helps to avoid knotting, and you thread will slip right through the fabric. Take tiny 1/8" stitches-- I had my optometrist make me a special pair of glasses for close sewing-- they are wonderful. Work in daylight, if possible. Stitch a little under the edge-- you'll get a little poof. And pull those stitches tight, but no so tight that your background fabric warps.

So there are a few tips-- of course, practice makes perfect-- doesn't it always? I find a little handwork very enjoyable at times. I love methods where you pre-make the pieces-- you have a nice little take along project. I'm traveling at the end of the month, so I hope to finish this block. After that, there are two left-- plus four borders! So maybe my forever project will end up as a grand-daughter's wedding gift, or maybe a great-grandaughter will unfold it, finished, in all of it's glory, and take it on her honeymoon to Mars. Whoever it is, I hope they feel the love in every stitch.
I am linking up with Kathy's Slow Stitching Sunday that I have always enjoyed reading. Hop on over there next to see what other's are doing!
https://kathysquilts.blogspot.com/
xox
Carol

The ones that are left are the harder ones, or ones I didn't like as much. I just pulled out "Spring Promise" which is at the bottom of the pile because... it has a butterfly in it.

I don't like butterflies.
They are just too overused and used badly so often... so while I work away at the leaves and flowers, I am thinking of changing it out for a dragonfly, my winged insect of choice. Or, since I always thought I was making this for my beloved son or daughter's wedding, I could leave the space blank for the names of the happy couple. (No, nothing is on the horizon yet, and I'm good with that, because I still need time to finish this!)

My previous nine blocks are like a short history of applique, as I used the techniques that were popular at the time, over the years. I did the leaves with Rosa Rojas' Appliquick tools-- I like them very much. The petals are supposed to be dimensional though, so I thought the technique where you sew the shape to a backing and then turn it, might work better. So here goes-- I need about 60 petals.
First, I double a scrap of fabric over and using a very tight stitch, made this petal shape. The bottom is left open for turning.

Then, I cut them out, a scant 1/4," and clipped the curves. I read that you should not make angled cuts, or you will get angles in your curve when turning; instead make "swooping cuts" and so far I agree, you do end up with a smoother curve. My stitching is tight enough so that I don't think the seam will open up. It occurs to me, as the machine embroidery queen, I could digitize a file to stitch this, and I may end up doing that to speed things up. The curves would be PERFECT!!

Then I turn them right side out-- I love this Clover turning tool. They look like little finger gloves--LOL.


Now I pick five assorted colors to make a flower and gather them all together at the bottom to make a five petaled flower-- see the finished yellow one below.

Let's talk tips. Over twenty years, my handwork has improved, and the switch to the Clover Black Gold Needle is the single biggest reason why. For needle-turned applique, you are supposed to use these honking long needles to help you--never helped me!! This little needle is about an inch long, and the CONTROL you have with it is amazing. It is also extremely sharp, and goes in right where you want it. WARNING: It takes a while to thread it!! heehee. But it gets easier.

Time to sew, and you can see I have ond flower down already. MORE TIPS: use a thread color that exactly matches your applique fabric. Use a THIN thread-- 100 wt. silk is wonderful-- I don't have the budget for an entire set of silk colors, so I have this 40wt set from Superior-- it's fine. Thread Heaven really helps to avoid knotting, and you thread will slip right through the fabric. Take tiny 1/8" stitches-- I had my optometrist make me a special pair of glasses for close sewing-- they are wonderful. Work in daylight, if possible. Stitch a little under the edge-- you'll get a little poof. And pull those stitches tight, but no so tight that your background fabric warps.
So there are a few tips-- of course, practice makes perfect-- doesn't it always? I find a little handwork very enjoyable at times. I love methods where you pre-make the pieces-- you have a nice little take along project. I'm traveling at the end of the month, so I hope to finish this block. After that, there are two left-- plus four borders! So maybe my forever project will end up as a grand-daughter's wedding gift, or maybe a great-grandaughter will unfold it, finished, in all of it's glory, and take it on her honeymoon to Mars. Whoever it is, I hope they feel the love in every stitch.
I am linking up with Kathy's Slow Stitching Sunday that I have always enjoyed reading. Hop on over there next to see what other's are doing!
https://kathysquilts.blogspot.com/
xox
Carol
I vote for a dragonfly (if you are taking votes) - maybe with somewhat dimensional wings? Thanks for the flower petal tutorial, too.
ReplyDeleteA dragonfly it is! Yes, it would be fun to make the wings out of tulle or something. xoxo
DeleteDragonfly has my vote, too. What great tips, too. Thanks for sharing for this beginner!
ReplyDeleteThumbs up! Happy stitching.
DeleteOMG! I have this BOM. I too bought it years ago when I just started out quilting. It was way to advanced for me at the time. Must drag it out sometime.
ReplyDelete